Vue 2 技术文档
Vue.js 是一款用于构建用户界面的渐进式框架。与其他重量级框架不同的是,Vue 被设计为可以自底向上逐层应用。Vue 的核心库只关注视图层,不仅易于上手,还便于与第三方库或既有项目整合。而 Vue.js 2(以下简称 Vue 2)则是该框架的一个重要版本,提供了许多新的特性和改进。本文将详细介绍 Vue 2 的各项功能及其使用方法。
目录
1. Vue 2 的安装和基本使用
安装 Vue 2
Vue 2 提供了多种安装方式:
-
通过 CDN 引入:
<script src="https://cdn.jsdelivr.net/npm/vue@2"></script> -
使用 npm 安装:
npm install vue@2 -
使用 Vue CLI 创建项目:
npm install -g @vue/cli
vue create my-project
cd my-project
npm run serve
创建 Vue 实例
一个简单的 Vue 实例示例:
<!DOCTYPE html>
<html>
<head>
  <title>Vue 2 示例</title>
  <script src="https://cdn.jsdelivr.net/npm/vue@2"></script>
</head>
<body>
  <div id="app">
    {{ message }}
  </div>

  <script>
    new Vue({
      el: '#app',
      data: {
        message: 'Hello, Vue 2!'
      }
    });
  </script>
</body>
</html>
在这个示例中,我们创建了一个新的 Vue 实例,并将其挂载到 #app 元素上。data 对象中的 message 属性将显示在页面上。
2. 模板语法
插值
Vue 允许在模板中使用双花括号语法进行数据绑定:
<div id="app">
  {{ message }}
</div>
也可以在属性中使用:
<div id="app">
  <span v-bind:title="message">
    鼠标悬停几秒钟查看此处动态绑定的提示信息!
  </span>
</div>
指令
指令(Directives)是带有 v- 前缀的特殊属性:
v-bind: 绑定属性v-if: 条件渲染v-for: 列表渲染v-on: 事件监听
示例:
<div id="app">
  <p v-if="seen">现在你看到我了</p>
</div>

<script>
  new Vue({
    el: '#app',
    data: {
      seen: true
    }
  });
</script>
计算属性
计算属性是基于依赖进行缓存的属性:
<div id="app">
  {{ reversedMessage }}
</div>

<script>
  new Vue({
    el: '#app',
    data: {
      message: 'Hello'
    },
    computed: {
      reversedMessage: function() {
        return this.message.split('').reverse().join('')
      }
    }
  });
</script>
在这个示例中,reversedMessage 是一个计算属性,它基于 message 计算出一个反转字符串。
3. Vue 实例
实例属性与方法
Vue 实例有许多属性和方法,如 el、data、methods 等:
<div id="app">
  <p>{{ message }}</p>
  <button @click="reverseMessage">Reverse Message</button>
</div>

<script>
  new Vue({
    el: '#app',
    data: {
      message: 'Hello Vue!'
    },
    methods: {
      reverseMessage: function () {
        this.message = this.message.split('').reverse().join('')
      }
    }
  });
</script>
生命周期钩子
Vue 实例在生命周期内会触发一些钩子函数:
<script>
  new Vue({
    el: '#app',
    data: {
      message: 'Hello Vue!'
    },
    created: function () {
      console.log('实例已创建');
    },
    mounted: function () {
      console.log('实例已挂载');
    },
    updated: function () {
      console.log('实例已更新');
    },
    destroyed: function () {
      console.log('实例已销毁');
    }
  });
</script>
4. 组件
定义与注册组件
Vue 组件是可复用的 Vue 实例,通常我们可以通过 Vue.component 方法来全局注册一个组件:
<div id="app">
  <my-component></my-component>
</div>

<script>
  Vue.component('my-component', {
    template: '<div>A custom component!</div>'
  });

  new Vue({
    el: '#app'
  });
</script>
也可以通过 components 选项局部注册组件:
<div id="app">
  <my-component></my-component>
</div>

<script>
  var myComponent = {
    template: '<div>A custom component!</div>'
  };

  new Vue({
    el: '#app',
    components: {
      'my-component': myComponent
    }
  });
</script>
组件通信
父子组件通信
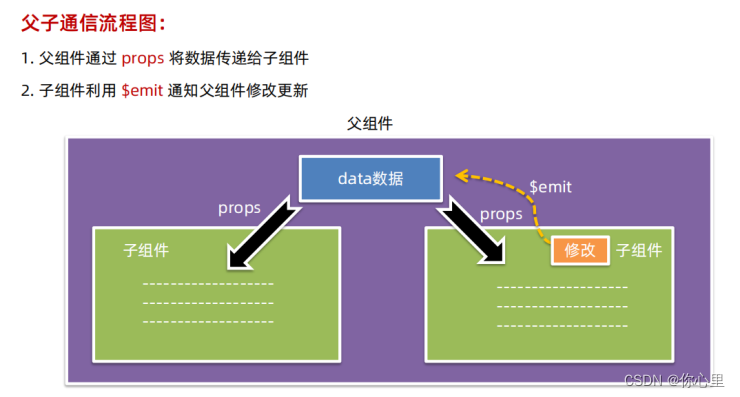
父组件通过 props 向子组件传递数据:
<div id="app">
  <child message="Hello from parent"></child>
</div>

<script>
  Vue.component('child', {
    props: ['message'],
    template: '<div>{{ message }}</div>'
  });

  new Vue({
    el: '#app'
  });
</script>
子组件通过 $emit 向父组件发送事件:
<div id="app">
  <button-counter @increment="incrementTotal"></button-counter>
  <p>总计点击次数: {{ total }}</p>
</div>

<script>
  Vue.component('button-counter', {
    template: '<button @click="incrementCounter">{{ counter }}</button>',
    data: function () {
      return {
        counter: 0
      }
    },
    methods: {
      incrementCounter: function () {
        this.counter += 1;
        this.$emit('increment');
      }
    }
  });

  new Vue({
    el: '#app',
    data: {
      total: 0
    },
    methods: {
      incrementTotal: function () {
        this.total += 1;
      }
    }
  });
</script>
5. 路由
Vue Router 是官方的路由管理器,用于构建单页面应用。
安装 Vue Router
npm install vue-router
配置路由
首先创建路由组件:
<div id="app">
  <router-view></router-view>
</div>

<script>
  const Foo = { template: '<div>foo</div>' }
  const Bar = { template: '<div>bar</div>' }

  const routes = [
    { path: '/foo', component: Foo },
    { path: '/bar', component: Bar }
  ]

  const router = new VueRouter({
    routes
  })

  new Vue({
    el: '#app',
    router
  })
</script>
动态路由匹配
你可以在路由路径中使用动态参数:
<div id="app">
  <router-view></router-view>
</div>

<script>
  const User = {
    template: '<div>User {{ $route.params.id }}</div>'
  }

  const routes = [
    { path: '/user/:id', component: User }
  ]

  const router = new VueRouter({
    routes
  })

  new

 Vue({
    el: '#app',
    router
  })
</script>
在这个示例中,/user/:id 路径中的 :id 是一个动态片段,$route.params.id 将会被当前的 id 值替换。
6. 状态管理
Vuex 是一个专为 Vue.js 应用设计的状态管理模式。
安装 Vuex
npm install vuex
Vuex 基本使用
创建一个简单的 Vuex store:
<script>
  const store = new Vuex.Store({
    state: {
      count: 0
    },
    mutations: {
      increment(state) {
        state.count++
      }
    }
  })

  new Vue({
    el: '#app',
    store,
    computed: {
      count() {
        return this.$store.state.count
      }
    },
    methods: {
      increment() {
        this.$store.commit('increment')
      }
    }
  })
</script>

<div id="app">
  <p>{{ count }}</p>
  <button @click="increment">Increment</button>
</div>
模块化
当应用变得复杂时,可以将 store 分割成模块:
<script>
  const moduleA = {
    state: () => ({ count: 0 }),
    mutations: {
      increment(state) {
        state.count++
      }
    }
  }

  const store = new Vuex.Store({
    modules: {
      a: moduleA
    }
  })

  new Vue({
    el: '#app',
    store,
    computed: {
      count() {
        return this.$store.state.a.count
      }
    },
    methods: {
      increment() {
        this.$store.commit('a/increment')
      }
    }
  })
</script>

<div id="app">
  <p>{{ count }}</p>
  <button @click="increment">Increment</button>
</div>
7. 过渡与动画
Vue 提供了非常易用的过渡效果系统。
过渡类名
可以使用 transition 组件来为元素添加过渡效果:
<div id="app">
  <button @click="show = !show">Toggle</button>
  <transition name="fade">
    <p v-if="show">Hello Vue!</p>
  </transition>
</div>

<script>
  new Vue({
    el: '#app',
    data: {
      show: true
    }
  })
</script>

<style>
.fade-enter-active, .fade-leave-active {
  transition: opacity 0.5s;
}
.fade-enter, .fade-leave-to /* .fade-leave-active in <2.1.8 */ {
  opacity: 0;
}
</style>
动画
Vue 也支持使用 CSS 动画和第三方动画库,例如 Animate.css:
<div id="app">
  <button @click="show = !show">Toggle</button>
  <transition
    name="bounce"
    enter-active-class="animated bounceIn"
    leave-active-class="animated bounceOut"
  >
    <p v-if="show">Hello Vue!</p>
  </transition>
</div>

<script>
  new Vue({
    el: '#app',
    data: {
      show: true
    }
  })
</script>

<link rel="stylesheet" href="https://cdnjs.cloudflare.com/ajax/libs/animate.css/4.1.1/animate.min.css"/>
8. HTTP 请求
在 Vue 项目中,通常使用 axios 来进行 HTTP 请求。
使用 axios
首先安装 axios:
npm install axios
在 Vue 组件中使用 HTTP 请求
在 Vue 组件中使用 axios 进行 HTTP 请求:
<div id="app">
  <ul>
    <li v-for="post in posts" :key="post.id">{{ post.title }}</li>
  </ul>
</div>

<script>
  new Vue({
    el: '#app',
    data: {
      posts: []
    },
    created() {
      axios.get('https://jsonplaceholder.typicode.com/posts')
        .then(response => {
          this.posts = response.data
        })
        .catch(error => {
          console.log(error)
        })
    }
  })
</script>
在这个示例中,我们在组件创建时发起 HTTP 请求,并将响应的数据绑定到组件的数据属性 posts 上。
9. 表单处理
Vue 2 提供了简单而强大的表单处理功能。
基本表单处理
使用 v-model 指令来创建双向数据绑定:
<div id="app">
  <input v-model="message" placeholder="edit me">
  <p>Message is: {{ message }}</p>
</div>

<script>
  new Vue({
    el: '#app',
    data: {
      message: ''
    }
  })
</script>
表单修饰符
Vue 提供了几个表单修饰符来简化表单处理:
.lazy: 取代input监听change事件。.number: 将用户输入自动转换为数值。.trim: 自动过滤用户输入的首尾空格。
示例:
<div id="app">
  <input v-model.lazy="message" placeholder="edit me">
  <input v-model.number="age" type="number" placeholder="age">
  <input v-model.trim="name" placeholder="name">
  <p>Message is: {{ message }}</p>
  <p>Age is: {{ age }}</p>
  <p>Name is: {{ name }}</p>
</div>

<script>
  new Vue({
    el: '#app',
    data: {
      message: '',
      age: null,
      name: ''
    }
  })
</script>
10. 插件
Vue.js 的插件系统使得我们可以很方便地扩展 Vue 的功能。
使用插件
使用插件通常需要通过 Vue.use 方法来注册:
<script>
  Vue.use(SomePlugin)
</script>
例如使用 Vue Router 插件:
<script>
  import Vue from 'vue'
  import VueRouter from 'vue-router'

  Vue.use(VueRouter)
</script>
创建插件
创建一个简单的插件:
MyPlugin.install = function (Vue, options) {
  Vue.myGlobalMethod = function () {
    console.log('MyPlugin global method')
  }

  Vue.directive('my-directive', {
    bind(el, binding, vnode, oldVnode) {
      el.textContent = binding.value
    }
  })

  Vue.prototype.$myMethod = function (methodOptions) {
    console.log('MyPlugin instance method')
  }
}

Vue.use(MyPlugin)
11. 实践
代码结构
-
目录结构:合理的目录结构能提升项目的可维护性。
components: 存放 Vue 组件。views: 存放视图组件(页面级)。store: 存放 Vuex 状态管理相关文件。router: 存放路由配置文件。
-
组件划分:尽量保持组件的单一职责,一个组件只完成一项任务。
-
命名规范:遵循一致的命名规范,如组件命名使用 PascalCase。
性能优化
- 按需加载:使用路由懒加载和动态导入来减少初始加载时间。
- 长列表性能优化:使用
v-for渲染大量数据时,使用v-bind:key。 - 避免不必要的响应:使用
Object.freeze冻结数据,避免深层嵌套的数据对象变成响应式。 - 使用事件代理:在大量元素上绑定事件时,使用事件代理。
本站资源均来自互联网,仅供研究学习,禁止违法使用和商用,产生法律纠纷本站概不负责!如果侵犯了您的权益请与我们联系!
转载请注明出处: 免费源码网-免费的源码资源网站 » Vue 2看这篇就够了

发表评论 取消回复