目录
一、tslib 介绍
tslib 是一个触摸屏的开源库,可以使用它来访问触摸屏设备,可以给输入设备添加各种 “ filter ” ( 过 滤 器 , 就 是 各 种 处 理 ) , 地 址 是 :http:// http://www.tslib.org/。
tslib在Linux系统中的主要作用是提供一个统一的、抽象的接口来管理不同类型的输入设备,尤其是触摸屏设备。这个库通过处理底层的硬件差异和复杂的数据转换,让开发人员可以更专注于应用层面的开发,而不必关心硬件层面的细节。
编译 tslib 后,可以得到 libts 库,还可以得到各种工具:较准工具、测试工具。
二、tslib 框架分析
tslib 的主要代码如图:
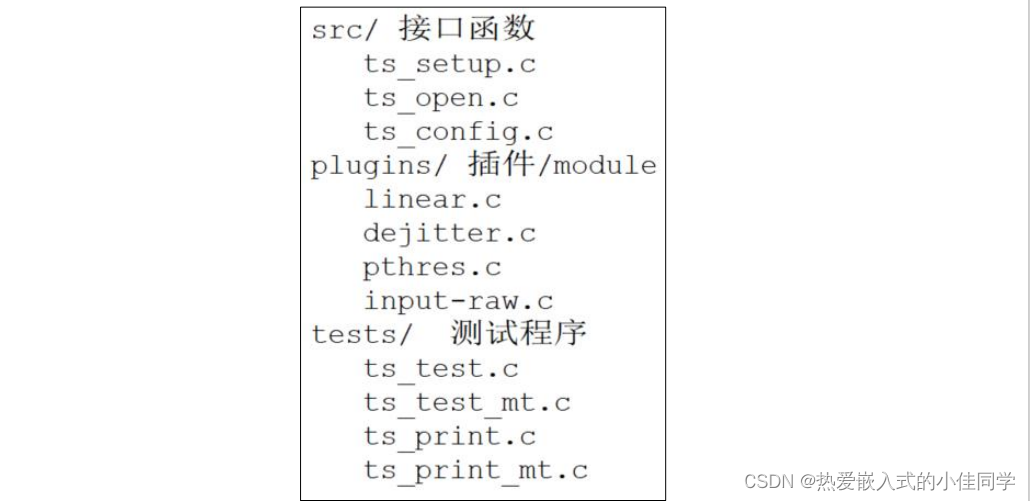
核心在于“plugins”目录里的“插件”,或称为“module”。这个目录下的每个文件都是一个 module,每个 module 都提供 2 个函数:read、read_mt,前者用于读取单点触摸屏的数据,后者用于读取多点触摸屏的数据。
要分析 tslib 的框架,先看看示例程序怎么使用,我们参考 ts_test.c 和 ts_test_mt.c,前者用于一般触摸屏(比如电阻屏、单点电容屏),后者用于多点触摸屏。 一个图就可以弄清楚 tslib 的框架:
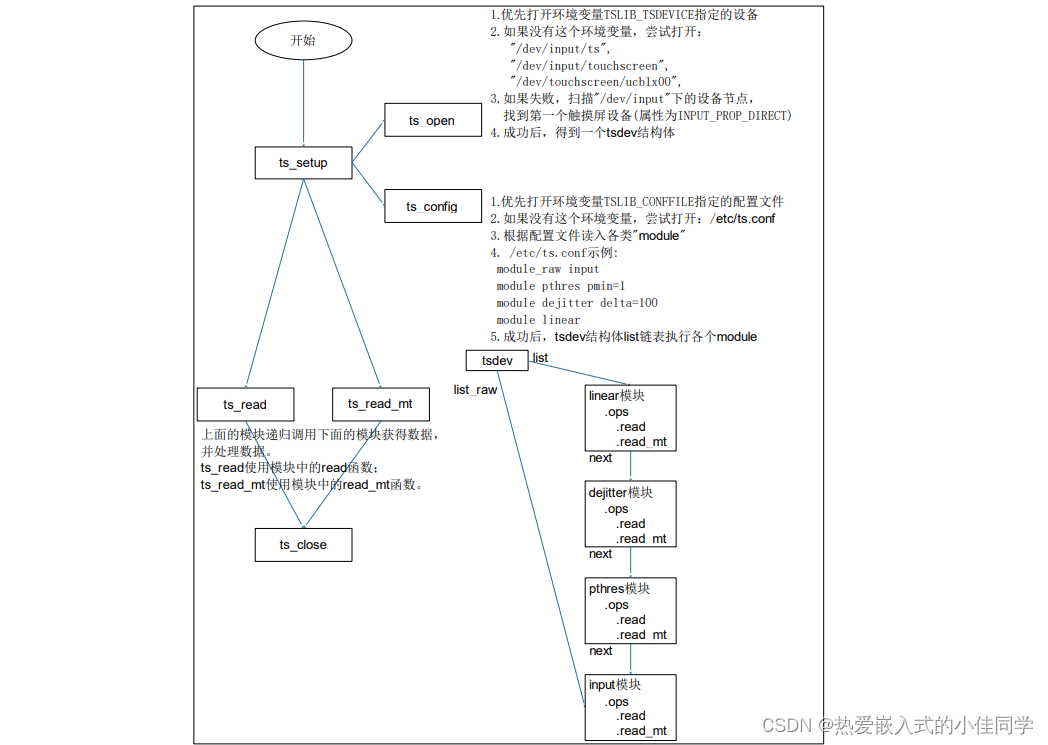
调用 ts_open 后,可以打开某个设备节点,构造出一个 tsdev 结构体。然后调用 ts_config 读取配置文件的处理,假设 /etc/ts.conf 内容如下:

每行表示一个“module”或“moduel_raw”。
对于所有的“module”,都会插入 tsdev.list 链表头,也就是 tsdev.list 执行配置文件中最后一个“module”,配置文件中第一个“module”位于链表的尾部。
对于所有的“module_raw”,都会插入 tsdev.list_raw 链表头,一般只有一个“module_raw”。
注意:tsdev.list 中最后一个“module”会指向 ts_dev.list_raw 的头部。
无论是调用 ts_read 还是 ts_read_mt,都是通过 tsdev.list 中的模块来处理数据的。这些模块是递归调用的,比如linear模块的read函数如图:

linear 模块的 read_raw 函数如图:

因为是递归调用,所有最先使用 input 模块读取设备节点得到原始数据,再依次经过 pthres 模块、dejitter 模块、linear 模块处理后,才返回最终数据。
三、交叉编译、测试 tslib
1.安装工具链 tslib
(1)设置交叉编译工具链
export ARCH=arm
export CROSS_COMPILE=arm-buildroot-linux-gnueabihf-
export PATH=$PATH:/home/book/100ask_imx6ull-sdk/ToolChain/arm-buildroot-linux-gnueabihf_sdk-buildroot/bin(2)进入tslib目录
从window上传tslib压缩包到ubuntu,然后执行下面命令进入tslib目录:
tar -xzf tslib-1.21.tar.xz
cd tslib-1.21
(3)安装工具链
执行下面命令:
./configure --host=arm-buildroot-linux-gnueabihf --prefix=/
make
make install DESTDIR=$PWD/tmp
cd tmp/
(4)确定工具链中头文件、库文件目录
echo 'main(){}'| arm-buildroot-linux-gnueabihf-gcc -E -v -
cp include/* /home/book/100ask_imx6ull-sdk/ToolChain/arm-buildroot-linux-gnueabihf_sdk-buildroot/arm-buildroot-linux-gnueabihf/sysroot/usr/includecp -d lib/*so* /home/book/100ask_imx6ull-sdk/ToolChain/arm-buildroot-linux-gnueabihf_sdk-buildroot/arm-buildroot-linux-gnueabihf/sysroot/usr/lib/2.测试 tslib
把库文件放到单板上:运行程序要用。先在开发板上使用 NFS 挂载 Ubuntu 的目录,再把前面编译出来的 tslib-1.21/tmp/部分文件复制到板子上,示例命令如下:

对于 IMX6ULL,首先需要关闭默认的 qt gui 程序,才可以执行 ts_test_mt 测试命令,关闭 qt 命令如下所示:
mv /etc/init.d/*hmi* /root
mv /etc/init.d/*lvgl* /root
reboot
在单板上执行测试程序:
export TSLIB_PLUGINDIR=/lib/ts
ts_test_mt

四、自己编写一个测试程序
1.接口函数深入分析
驱动程序使用 slot、tracking_id 来标识一个触点;当 tracking_id 等于 -1 时,标识这个触点被松开了。
触摸屏可能支持多个触点,比如 5 个:tslib 为了简化处理,即使只有 2 个 触点,ts_read_mt 函数也会返回 5 个触点数据,可以根据标志位判断数据是否有效。
ts_read_mt 函数原型如图:

假设nr设置为1,max_slots设置为5,那么读到的数据保存在:samp[0][0]、 samp[0][1]、samp[0][2]、samp[0][3]、samp[0][4]中。
假设nr设置为2,max_slots设置为5,那么读到的数据保存在:samp[0][0]、 samp[0][1] 、 samp[0][2] 、 samp[0][3] 、 samp[0][4] 和 samp[1][0] 、 samp[1][1]、samp[1][2]、samp[1][3]、samp[1][4]中。
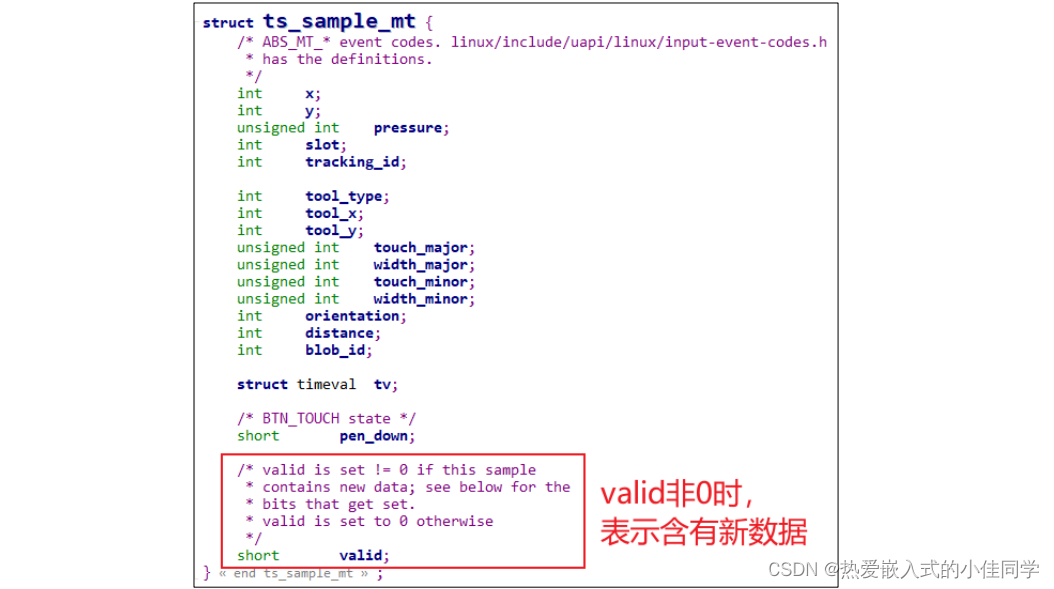
ts_sample_mt 结构体如图:
2.编写代码
实现一个程序,不断打印 2 个触点的距离。
思路:假设是 5 点触摸屏,调用一次 ts_read_mt 可以得到 5 个新数据;使用新旧数据进行判断,如果有 2 个触点,就打印出距离。
#include <stdio.h>
#include <stdint.h>
#include <stdlib.h>
#include <string.h>
#include <signal.h>
#include <errno.h>
#include <sys/types.h>
#include <sys/stat.h>
#include <fcntl.h>
#include <unistd.h>
#include <getopt.h>

#include <linux/input.h>

#include <sys/ioctl.h>

#include <tslib.h>

int distance(struct ts_sample_mt *point1, struct ts_sample_mt *point2)
{
	int x = point1->x - point2->x;
	int y = point1->y - point2->y;

	return x*x + y*y;
}

int main(int argc, char **argv)
{
	struct tsdev *ts;
	int i;
	int ret;
	struct ts_sample_mt **samp_mt;
	struct ts_sample_mt **pre_samp_mt;
	int max_slots;
	int point_pressed[20];
	struct input_absinfo slot;
	int touch_cnt = 0;

	ts = ts_setup(NULL, 0);
	if (!ts)
	{
		printf("ts_setup err\n");
		return -1;
	}

	if (ioctl(ts_fd(ts), EVIOCGABS(ABS_MT_SLOT), &slot) < 0) {
		perror("ioctl EVIOGABS");
		ts_close(ts);
		return errno;
	}

	max_slots = slot.maximum + 1 - slot.minimum;

	samp_mt = malloc(sizeof(struct ts_sample_mt *));
	if (!samp_mt) {
		ts_close(ts);
		return -ENOMEM;
	}
	samp_mt[0] = calloc(max_slots, sizeof(struct ts_sample_mt));
	if (!samp_mt[0]) {
		free(samp_mt);
		ts_close(ts);
		return -ENOMEM;
	}

	pre_samp_mt = malloc(sizeof(struct ts_sample_mt *));
	if (!pre_samp_mt) {
		ts_close(ts);
		return -ENOMEM;
	}
	pre_samp_mt[0] = calloc(max_slots, sizeof(struct ts_sample_mt));
	if (!pre_samp_mt[0]) {
		free(pre_samp_mt);
		ts_close(ts);
		return -ENOMEM;
	}


	for ( i = 0; i < max_slots; i++)
		pre_samp_mt[0][i].valid = 0;

	while (1)
	{
		ret = ts_read_mt(ts, samp_mt, max_slots, 1);

		if (ret < 0) {
			printf("ts_read_mt err\n");
			ts_close(ts);
			return -1;
		}

		for (i = 0; i < max_slots; i++)
		{
			if (samp_mt[0][i].valid)
			{
				memcpy(&pre_samp_mt[0][i], &samp_mt[0][i], sizeof(struct ts_sample_mt));
			}
		}

		touch_cnt = 0;
		for (i = 0; i < max_slots; i++)
		{
			if (pre_samp_mt[0][i].valid && pre_samp_mt[0][i].tracking_id != -1)
				point_pressed[touch_cnt++] = i;
		}

		if (touch_cnt == 2)
		{
			printf("distance: %08d\n", distance(&pre_samp_mt[0][point_pressed[0]], &pre_samp_mt[0][point_pressed[1]]));
		}
	}

	return 0;
}
3.上机测试
交叉编译.c文件:记得链接 ts 库,否则会报错。
arm-buildroot-linux-gnueabihf-gcc mt_cal_distance.c -o test -lts
上电开发板,挂载 ubuntu 的 NFS 目录,执行 ./test ,用手在屏幕滑动即可看到现象。
本站资源均来自互联网,仅供研究学习,禁止违法使用和商用,产生法律纠纷本站概不负责!如果侵犯了您的权益请与我们联系!
转载请注明出处: 免费源码网-免费的源码资源网站 » 交叉编译tslib库和上机测试

发表评论 取消回复