前言
如果在弹窗中单独增设一些选项或者少部分的数据,可用如下的方式
(不用单独创建专门的表单样式)
如果单纯可以通过基本的按钮传输给后端,可用如下知识点
对于弹窗的基本知识推荐阅读:
1. Vue2
此处涉及avue的知识点,推荐阅读:【vue】avue-crud表单属性配置(表格以及列)
基本的功能如下:
对应的template部分(以下代码为从实战中抽取)
<template>
<avue-crud :option="option"
:table-loading="loading"
:data="data"
:page="page"
:permission="permissionList"
:before-open="beforeOpen"
:cell-style="cellStyle"
v-model="form"
ref="crud"
@row-update="rowUpdate"
@row-save="rowSave"
@row-del="rowDel"
@search-change="searchChange"
@search-reset="searchReset"
@selection-change="selectionChange"
@current-change="currentChange"
@size-change="sizeChange"
@refresh-change="refreshChange"
@on-load="onLoad">
<template slot="menuLeft">
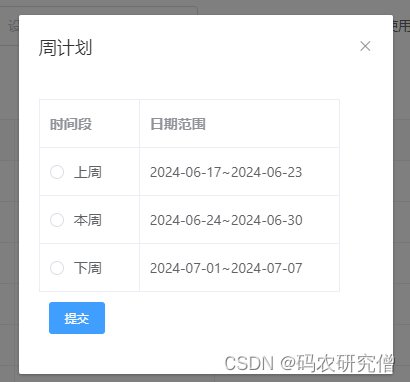
<el-button type="primary" size="small" plain @click="showWeekPlanDialog">生成周月计划</el-button>
<el-dialog title="周计划" :visible.sync="showWeekPlanDialogBox" :append-to-body="true" width="20%">
<el-radio-group v-model="selectedPeriod" @change="handlePeriodChange">
<el-table :data="weekPeriods" border>
<el-table-column label="时间段" width="100">
<template slot-scope="scope">
<el-radio :label="scope.row.label"></el-radio>
</template>
</el-table-column>
<el-table-column prop="dateRange" label="日期范围" width=200></el-table-column>
</el-table>
</el-radio-group>
<el-button type="primary" size="small" @click="submitWeekPlan" style="margin: 10px;">提交</el-button>
</el-dialog>
</template>
</avue-crud>
</template>
对应的功能部分如下:
<script>
  import { doCheckWeekPlan } from "@/api/equipment/basicInfo/inforunningdata";
  import moment from 'moment';

  export default {
    data() {
      return {
        showWeekPlanDialogBox: false, // 控制弹窗显示
        selectedPeriod: '', // 选中的时间段
        weekPeriods: [], // 时间段数组
        loading: true,
        page: {
          pageSize: 100,
          currentPage: 1,
          total: 0
        },
        selectionList: []
      };
    },
    methods: {
      // 显示周月计划弹窗
      showWeekPlanDialog() {
        if (this.selectionList.length === 0) {
          this.$message.warning("请选择至少一条数据");
          return;
        }
        this.calculateWeekPeriods();
        this.showWeekPlanDialogBox = true;
      },
      // 计算时间段
      calculateWeekPeriods() {
        const today = moment();
        const startDateThisWeek = today.clone().startOf('isoWeek');
        const endDateThisWeek = today.clone().endOf('isoWeek');
        const startDateLastWeek = startDateThisWeek.clone().subtract(1, 'week');
        const endDateLastWeek = startDateLastWeek.clone().endOf('isoWeek');
        const startDateNextWeek = startDateThisWeek.clone().add(1, 'week');
        const endDateNextWeek = startDateNextWeek.clone().endOf('isoWeek');

        const formatDateRange = (startDate, endDate) => {
            return `${startDate.format('YYYY-MM-DD')}~${endDate.format('YYYY-MM-DD')}`;
        };

        this.weekPeriods = [
            { label: '上周', dateRange: formatDateRange(startDateLastWeek, endDateLastWeek) },
            { label: '本周', dateRange: formatDateRange(startDateThisWeek, endDateThisWeek) },
            { label: '下周', dateRange: formatDateRange(startDateNextWeek, endDateNextWeek) }
        ];
      },
      // 提交周月计划
      submitWeekPlan() {
        if (this.selectedPeriod === '') {
          this.$message.warning("请选择一个时间段");
          return;
        }
        doCheckWeekPlan(this.ids, this.selectedPeriod).then(() => {
          this.onLoad(this.page);
          this.$message({
            type: "success",
            message: "操作成功!"
          });
          this.showWeekPlanDialogBox = false;
        }).catch(error => {
          console.log(error);
        });
      }
    }
  };
</script>
- showWeekPlanDialogBox:控制弹窗显示的布尔值
- selectedPeriod:存储用户选择的时间段
- weekPeriods:存储计算后的时间段数组
- showWeekPlanDialog:显示弹窗的方法,并在没有选中数据时提示用户
- calculateWeekPeriods:计算并格式化上周、本周、下周的时间段
- submitWeekPlan:提交选中的时间段并调用API,成功后刷新数据并关闭弹窗
对于Js的日期,推荐阅读:js获取上周本周下周的日期(附Demo)
2. Vue3
整体界面如下:
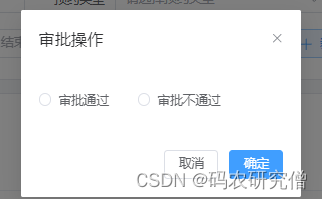
增加一个AuditDialog.vue文件
<template>
  <el-dialog :model-value="modelValue" @update:model-value="updateVisible" title="审批操作" width="15%">
    <el-radio-group v-model="selectedResult">
      <el-radio label="通过">审批通过</el-radio>
      <el-radio label="不通过">审批不通过</el-radio>
    </el-radio-group>
    <template #footer>
      <el-button @click="handleCancel">取消</el-button>
      <el-button type="primary" @click="handleConfirm">确定</el-button>
    </template>
  </el-dialog>
</template>

<script setup>
import { ref, watch } from 'vue';
import { ElMessage } from 'element-plus';

const props = defineProps({
  modelValue: {
    type: Boolean,
    required: true
  }
});

const emit = defineEmits(['confirm', 'update:modelValue']);

const selectedResult = ref('');

const handleConfirm = () => {
  if (!selectedResult.value) {
    ElMessage.error('请选择审批结果');
    return;
  }
  emit('confirm', selectedResult.value);
  emit('update:modelValue', false);
};

const handleCancel = () => {
  emit('update:modelValue', false);
};

const updateVisible = (value) => {
  emit('update:modelValue', value);
};

watch(() => props.modelValue, (newVal) => {
  if (!newVal) {
    selectedResult.value = ''; // 重置选择
  }
});
</script>
对应的父组件如下:
<template>
  <ContentWrap>
    <!-- 列表 -->
    <el-row justify="center" class="table-title">
      <el-col :span="24" class="text-center">
        委托单列表
      </el-col>
    </el-row>
    <el-table v-loading="loading" :data="list" :stripe="true" :show-overflow-tooltip="true">
      <el-table-column label="预约编号" align="center" prop="appointmentId" />
      <el-table-column label="操作" align="center" width="180px">
        <template #default="scope">
          <div class="action-buttons">
            <el-button
              link
              type="primary"
              @click="openAuditDialog(scope.row.id)"
              v-if="scope.row.appointmentStatus === '待码头确认'"
              v-hasPermi="['dangerous:appointment-commission:audit']"
            >
              审核
            </el-button>
          </div>
        </template>
      </el-table-column>
    </el-table>
    <!-- 分页 -->
    <Pagination
      :total="total"
      v-model:page="queryParams.pageNo"
      v-model:limit="queryParams.pageSize"
      @pagination="getList"
    />
    <!-- 审核对话框 -->
    <AuditDialog v-model:modelValue="isAuditDialogVisible" @confirm="handleAudit" />
  </ContentWrap>
</template>

<script setup>
import { ref } from 'vue';
import { ElMessage } from 'element-plus';
import AuditDialog from './AuditDialog.vue'; // 导入自定义对话框组件
import AppointmentCommissionApi from './api'; // 假设你有一个 API 模块
import { getList } from './utils'; // 假设你有一个获取列表的工具函数

const loading = ref(false);
const list = ref([]);
const total = ref(0);
const queryParams = ref({
  pageNo: 1,
  pageSize: 10
});
const isAuditDialogVisible = ref(false);
const currentAuditId = ref(null);

const openAuditDialog = (id) => {
  currentAuditId.value = id;
  isAuditDialogVisible.value = true;
};

const handleAudit = async (result) => {
  try {
    const response = await AppointmentCommissionApi.auditAppointmentCommission(currentAuditId.value, result === '通过');
    if (response === true) {
      ElMessage.success('审批成功');
      await getList(); // 成功后刷新列表
    } else {
      ElMessage.error('审批失败'); // 处理失败情况
    }
  } catch (error) {
    ElMessage.error('审批操作失败'); // 处理任何错误
  } finally {
    isAuditDialogVisible.value = false; // 关闭对话框
  }
};

// 模拟获取列表数据
const getList = async () => {
  loading.value = true;
  // 模拟异步请求
  setTimeout(() => {
    list.value = [
      { id: 1, appointmentId: 'A123', appointmentStatus: '待码头确认' },
      { id: 2, appointmentId: 'A456', appointmentStatus: '已确认' },
      // 添加更多数据
    ];
    total.value = list.value.length;
    loading.value = false;
  }, 1000);
};

getList();
</script>

<style scoped>
.table-title {
  margin: 20px 0;
}
.action-buttons {
  display: flex;
  justify-content: center;
  gap: 10px;
}
</style>
本站资源均来自互联网,仅供研究学习,禁止违法使用和商用,产生法律纠纷本站概不负责!如果侵犯了您的权益请与我们联系!
转载请注明出处: 免费源码网-免费的源码资源网站 » 使用 Vue 实现包含单选框的弹窗功能(附Demo)

发表评论 取消回复