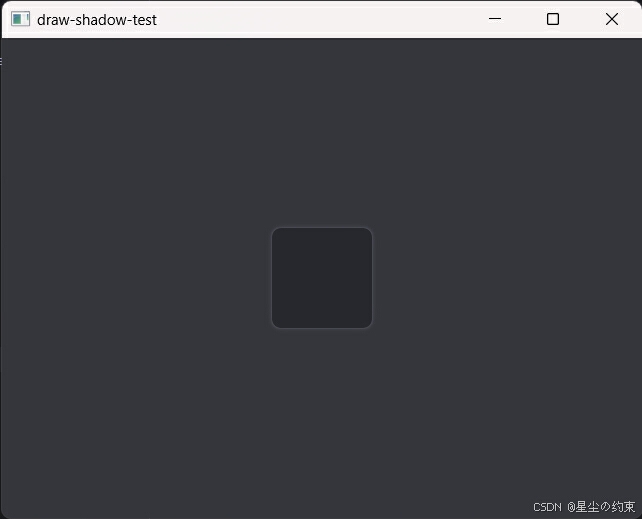
困扰了很久的问题,今天终于明白了如何绘制QGraphicDropShadowEffect同样效果的阴影,故写下这篇文章分享给大家。其方法是复制Qt源代码中QGraphicDropShadowEffect绘制实现的核心代码然后稍作修改实现,先看效果和封装过后的源代码:
头文件:
#pragma once

#include <qwidget.h>

class CustomWidget : public QWidget {
public:
    explicit CustomWidget(QWidget *parent = nullptr);

protected:
    void paintEvent(QPaintEvent *event) override;

private:
    /**
     * @brief 为对象绘制阴影
     * @param painter
     * @param shadowObjectPixCache 对象临时缓冲图形
     * @param pos 绘制位置
     * @param blurRadius 阴影半径
     * @param color 阴影颜色
     * @param offset 偏移
     */
    static void drawShadow(QPainter* painter, const QPixmap &shadowObjectPixCache, const QPointF& pos, qreal blurRadius, const QColor &color, const QPointF &offset);
};
源文件:
#include "customwidget.h"

#include <qpainter.h>
#include <qmath.h>

CustomWidget::CustomWidget(QWidget *parent)
    : QWidget(parent)
{}

void CustomWidget::paintEvent(QPaintEvent *event) {
    QPainter painter(this);

    painter.fillRect(rect(), 0x35363C);

    QRect drawRect(0, 0, 100, 100);
    // 创建缓存图片在上面绘制图形
    QPixmap cacheImage(drawRect.width(), drawRect.height());
    cacheImage.fill(Qt::transparent);
    QPainter cachePainter(&cacheImage);
    cachePainter.setRenderHint(QPainter::Antialiasing);
    cachePainter.setBrush(QColor(0x26282D));
    cachePainter.setPen(Qt::NoPen);
    // 绘制一个圆角矩形
    cachePainter.drawRoundedRect(drawRect, 9, 9);
    cachePainter.end();
    // 左上角
    auto topLeft = rect().center() - drawRect.center();
    // 绘制图片和阴影
    drawShadow(&painter, cacheImage, topLeft, 6, 0x6B6F79, QPointF(0, 0));
}

// Qt internal function (qtbase/src/widgets/effects/qpixmapfilter.cpp)
extern void qt_blurImage(QPainter *p, QImage &blurImage, qreal radius, bool quality, bool alphaOnly, int transposed);

// qtbase/src/widgets/effects/qpixmapfilter.cpp: line 1317
void CustomWidget::drawShadow(QPainter* painter, const QPixmap &shadowObjectPixCache, const QPointF& pos, qreal blurRadius, const QColor &color, const QPointF &offset) {

    // temp render object
    QImage tmp(shadowObjectPixCache.size() + QSize(qCeil(blurRadius * 2), qCeil(blurRadius * 2)), QImage::Format_ARGB32_Premultiplied);
    tmp.setDevicePixelRatio(shadowObjectPixCache.devicePixelRatioF());
    tmp.fill(0);
    QPainter tmpPainter(&tmp);
    tmpPainter.setCompositionMode(QPainter::CompositionMode_Source);
    tmpPainter.drawPixmap(QPointF(blurRadius, blurRadius) + offset, shadowObjectPixCache);
    tmpPainter.end();

    // blur the alpha channel
    QImage blurred(tmp.size(), QImage::Format_ARGB32_Premultiplied);
    blurred.setDevicePixelRatio(shadowObjectPixCache.devicePixelRatioF());
    blurred.fill(0);
    QPainter blurPainter(&blurred);
    qt_blurImage(&blurPainter, tmp, blurRadius, false, true, 0);
    blurPainter.end();

    tmp = std::move(blurred);

    // blacken the image...
    tmpPainter.begin(&tmp);
    tmpPainter.setCompositionMode(QPainter::CompositionMode_SourceIn);
    tmpPainter.fillRect(tmp.rect(), color);
    tmpPainter.end();

    // draw shadow image
    painter->drawImage(pos - QPointF(blurRadius, blurRadius), tmp);

    // draw source image
    painter->drawPixmap(pos, shadowObjectPixCache);
}
跟上面的示例一样,在绘制阴影之前先创建一个缓存图片,再调用drawShadow创建阴影。上面代码中的drawShadow正是复制的Qt源代码qtbase/src/widgets/effects/qpixmapfilter.cpp第1317行(Qt5.15.2)的阴影绘制函数,然后稍作修改实现。然后其中用到的一个关键函数qt_blurImage为Qt内部函数,这里仅声明就可以直接导出来使用。看了源代码后就明白了为什么有时候QGraphicDropShadowEffect绘制效率很低界面卡顿,其原因是创建了两个相同大小的临时图片和qt_blurImage的计算导致的。因此在使用该方法的时候,最好使用双缓冲的方式在大小不变的情况下只绘制一次阴影。其他类型的阴影都可以参考qpixmapfilter.cpp中的实现。
本站资源均来自互联网,仅供研究学习,禁止违法使用和商用,产生法律纠纷本站概不负责!如果侵犯了您的权益请与我们联系!
转载请注明出处: 免费源码网-免费的源码资源网站 » Qt中使用QPainter绘制阴影

发表评论 取消回复